반응형
1. 채널(채팅방) 생성
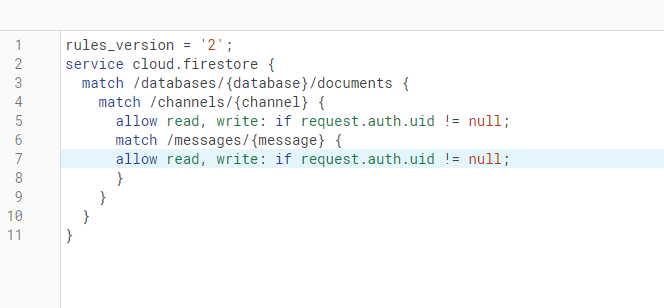
파이어베이스 데이터베이스
-서버를 구축하지 않고 파이어베이스의 데이터베이스 활용.
-파이어베이스에서 제공하는 파이어스토어는 NoSQL 문서 중심 데이터베이스로써, SQL 데이터베이스와 달리 테이블이나 행이 없고 컬렉션(collections), 문서(document), 필드(field)로 구성됨.
-컬렉션과 문서는 항상 유일한 ID를 가지고 있어야함. 이번 프로젝트에서는 channels라는 ID를 가진 하나의 컬렉션을 만들고 생성되는 채팅방을 channels 컬렉션에 문서로 저장 예정.
파이어베이스 데이터베이스 규칙 수정
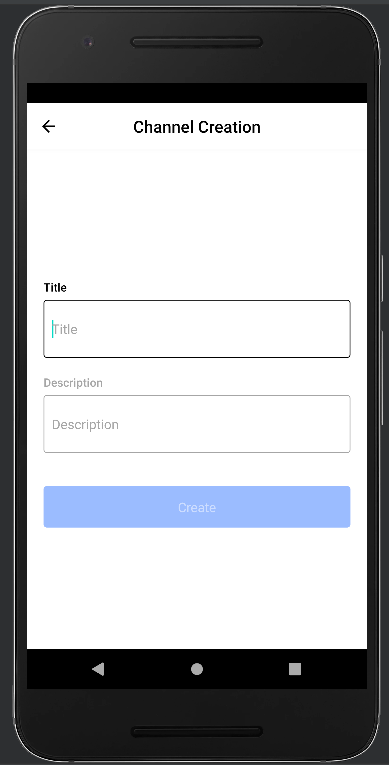
ChannelCreation.js
- KeyboardAwareScrollView 컴포넌트 : Input 컴포넌트를 사용할 때 자동으로 스크롤 위치를 이동하여 키보드가 Input 컴포넌트를 가리지 않도록함.
- 너무 긴 제목과 설명이 입력되는 것을 방지하기 위해 Input 최대 길이 지정
const ChannelCreation = ({navigation}) => {

    const {spinner} = useContext(ProgressContext);

    const [title, setTitle] = useState('');
    const [description, setDescription] = useState('');
    const descriptionRef = useRef();
    const [errorMessage, setErrorMessage] = useState('');
    const [disabled, setDisabled] = useState(true);

    useEffect(() => {
        setDisabled(!(title && !errorMessage));
    }, [title, description, errorMessage]);

    const _handleTitleChange = title => {
        setTitle(title);
        setErrorMessage(title.trim() ? '' : 'Please enter the title.');
    };

    const _handleCreateButtonPress = async () => {
        try {
          spinner.start();
          const id = await createChannel({ title, description });
          navigation.replace('Channel', { id, title });
        } catch (e) {
          Alert.alert('Creation Error', e.message);
        } finally {
          spinner.stop();
        }
      };


    return(
        <KeyboardAwareScrollView
            contentContainerStyle={{flex: 1}}
            extraScrollHeight={20}
        >
        <Container>
            {/* <Text style={{fontSize: 24}}>Channel Creation</Text> */}
            <Input
                label="Title"
                value={title}
                onChangeText={_handleTitleChange}
                onSubmitEditing={()=>{
                    setTitle(title.trim());
                    descriptionRef.current.focus();
                }}
                onBlur={()=>setTitle(title.trim())}
                placeholder="Title"
                returnKeyType="next"
                maxLength={20}
            />
            <Input
                ref={descriptionRef}
                label="Description"
                value={description}
                onChangeText={text => setDescription(text)}
                onSubmitEditing={()=>{
                    setDescription(description.trim());
                    _handleCreateButtonPress();
                }}
                onBlur={()=>setDescription(description.trim())}
                placeholder="Description"
                returnKeyType="done"
                maxLength={40}
            />
            <ErrorText>{errorMessage}</ErrorText>
            <Button
                title="Create"
                onPress={_handleCreateButtonPress}
                disabled={disabled}
            />
        </Container>
        </KeyboardAwareScrollView>
    );
};

export default ChannelCreation;
실행 화면
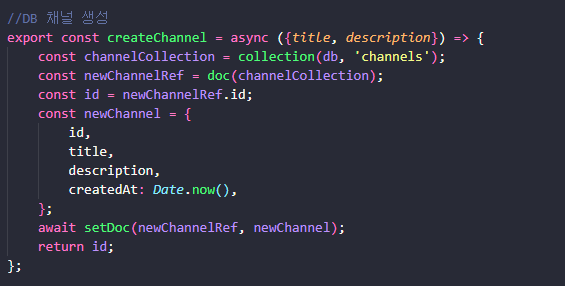
채널 생성 함수
채널 생성 버튼
headerRight: () =>
                index === 0 && (
                    <MaterialIcons
                        name="add"
                        size={26}
                        style={{margin: 10}}
                        onPress={()=>navigation.navigate('Channel Creation')}
                    />
                ),
채널 생성


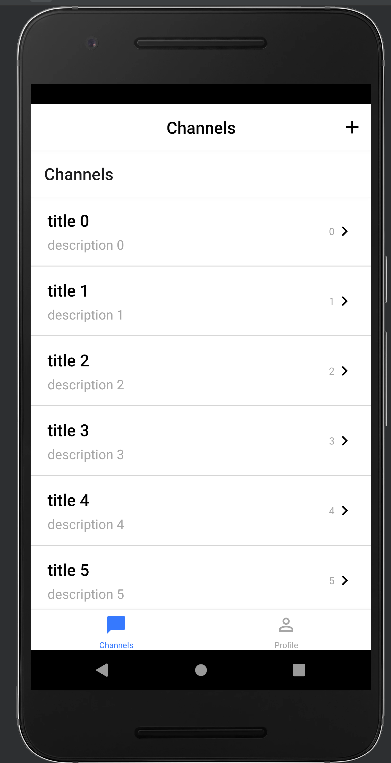
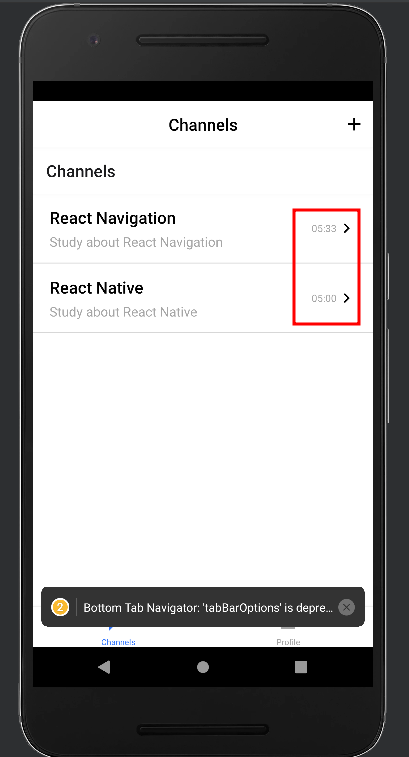
2. 채널 목록
FlatList
-ScrollView와 같은 역할을 수행하지만 화면에 적절한 양의 데이터만 렌더링하고 스크롤의 이동에 맞춰 필요한 부분을 추가적으로 랜더링하는 특징이 있다.
임의로 1000개의 데이터를 생성해 목록 화면 만들기

3. moment 라이브러리
moment 라이브러리
-시간 및 날짜와 관련된 함수를 쉽게 작성할 수 있도록 도와줌.
moment 라이브러리 설치
npm install momentmoment 라이브러리를 이용해 createdAt 필드에 저장된 타임스탬프를 익숙한 날짜 형식으로 변경
- 생성 날짜가 오늘과 같으면 시간을 랜더링, 하루 이상 차이가 나면 생성된 날짜를 랜더링함.
const getDateOrTime = ts => {
    const now = moment().startOf('day');
    const target = moment(ts).startOf('day');
    return moment(ts).format(now.diff(target, 'days') > 0 ? 'MM/DD' : 'HH:mm');
};
실행 화면
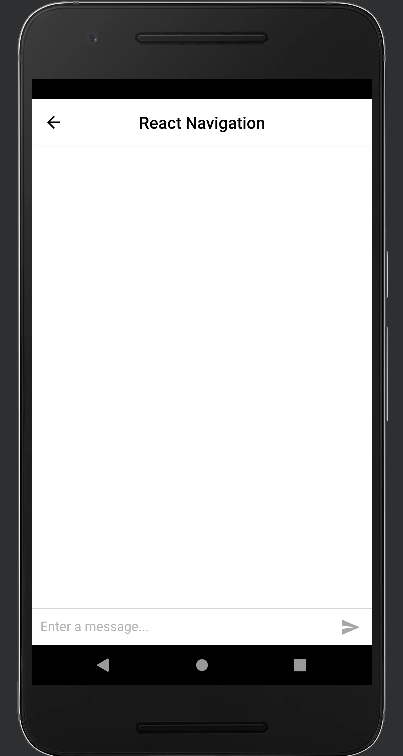
4. GiftedChat 컴포넌트
메시지를 주고받는 화면은 일반적인 모바일 화면과 스크롤 방향이 반대이므로 FlatList 컴포넌트의 inverted 속성을 활용하여 값에 따라 FlatList 컴포넌트를 뒤집은 것처럼 스크롤 방향 변경
inverted={true}react-gifted-chat 라이브러리를 사용해 화면 구성하기
- 입력된 내용을 설정된 사용자 정보, 자동으로 생성된 ID와 함께 전달하는 기능, 전송 버튼 수정 기능 등 다양한 기능을 제공함.
npm install react-native-gifted-chat <GiftedChat
listViewProps={{
style: {backgroundColor: theme.background},
}}
placeholder="Enter a message..."
messages={messages}
user={{_id: uid, name, avatar: photoUrl}}
onSend={_handleMessageSend}
alwaysShowSend={true}
textInputProps={{
autoCapitalize: 'none',
autoCorrect: false,
textContentType: 'none', //iOS only
underlineColorAndroid: 'transparent', //Android only
}}
multiline={false}
renderUsernameOnMessage={true}
scrollToBottom={true}
renderSend={props => <SendButton {...props} />}
/>
</Container>
);
};- onSend에 정의된 함수에 파라미터로 전달되는 값을 이용해 createMessage 함수를 호출
 const _handleMessageSend = async messageList => {
        const newMessage = messageList[0];
        try{
            await createMessage({channelId: route.params.id, message: newMessage});
        }catch(e){
            Alert.alert('Send Message Error', e.message);
        }
};- 전달되는 파라미터를 message 객체로, 생성되는 메시지 문서도 전달된 문서에 포함된 _id값으로 사용하도록 수정
//메시지 전송
export const createMessage = async ({channelId, message}) => {
    const docRef = doc(db, `channels/${channelId}/messages`, message._id);
    await setDoc(docRef, {...message, createdAt: Date.now()});
}
실행 화면
에러 해결중 ㅠㅠㅠㅠ
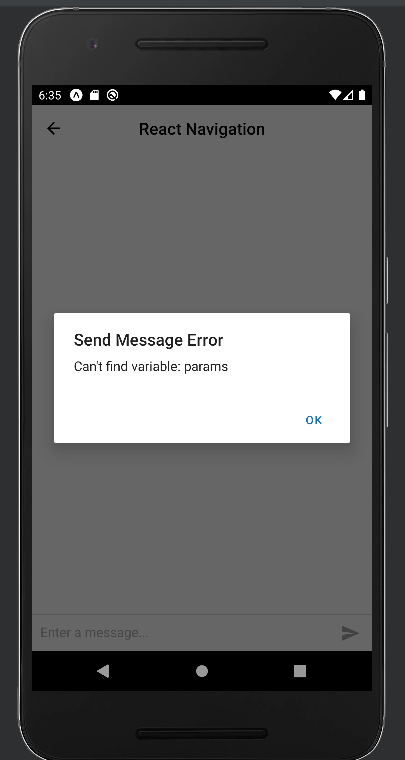
해결 완료 : 역시나 오타였다고 합니다....

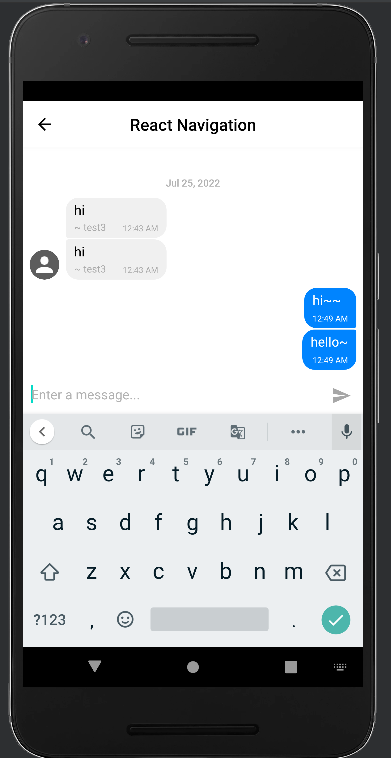
- 메시지에 함께 저장된 사용자 정보를 바탕으로 본인 메시지는 오른쪽, 상대방 메시지는 왼쪽에 렌더링됨
- 메시지 배경색도 다르게 적용됨.
반응형